

Friday, August 9, 2019
I made this: ROM The Spaceknight 5.5
Really hard to get a good picture of this guy because of the chrome .
 the light reflecting off of him makes the paint look patchy and streaky but in person it doesn't look that way at all .
Wednesday, July 24, 2019


Monday, July 22, 2019


Tuesday, June 25, 2019
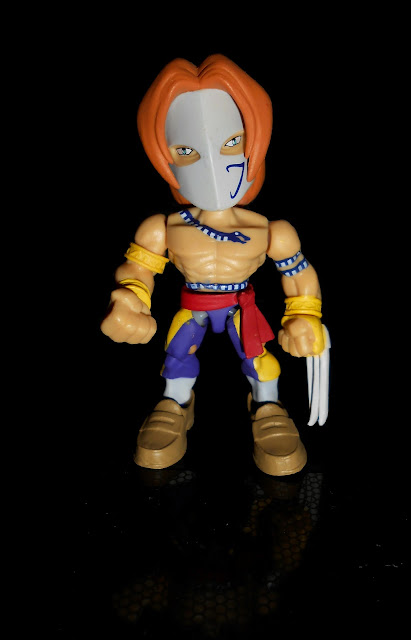
I made this :Thundarr the Barbarian.
This is my take on a 5.5 version of Thundarr the Barbarian.


Long ago Remco acquired the rites to make toys for Thundarr the Barbarian and the world of Kazar but the never materialized Ive never seen so much as a prototype for these figures but I can only guess that they would have been amazing.


Long ago Remco acquired the rites to make toys for Thundarr the Barbarian and the world of Kazar but the never materialized Ive never seen so much as a prototype for these figures but I can only guess that they would have been amazing.
Friday, June 21, 2019
into the slime pit pit.
These are Slime pit edition Mordles and OMFG minifigures . These guys are my favorite color.


Sunday, May 26, 2019


Tuesday, May 14, 2019


Wednesday, May 8, 2019


Saturday, May 4, 2019


Saturday, April 27, 2019

Wednesday, April 10, 2019
Made by me! Sir Brundle ( The Fly sword and sorcery style )
After placing his trust in a bumbling wizard, and his poorly executed transportation spell, Sir Brundle has been left horribly deformed; and hungry for sweets. I finished guy Up the other day. I can't seem to get pictures that do him justice.


Sunday, April 7, 2019
Made by me! Remco Warrior Beasts Anglor. *repost from 5.5 Alive*
*this was originally published on my 5.5 alive blog .I thought I would go ahead and post it here so anybody not following that blog could see it.*
I finished this guy up yesterday and Im extremely pleased with the finished results.


 I tried to keep in the spirit of the origenal Remco Warrior Beasts and I think for the most part he fits in perfect.
Here are a few bonus pictures that I took that documents the creation of the head from beginning to end.
This is the origenal toy I used for the head unaltered.
 here it is cut into a few pieces
 This is Milliput 2 part epoxy clay.I I built an extension onto the head to taper out the shape and hold the fin.
 This is the nearly finished paint job. The step between this and the final step really didn't photograph well because it was just a thin wash of nearly transparent pearlescent white.
 and this is the completed head. I use a thin coat of Pledge future shine floor polish as my clear coat. I find it gives just the right amount of gloss to match that of vintage 1980's toys.

I finished this guy up yesterday and Im extremely pleased with the finished results.


Here are a few bonus pictures that I took that documents the creation of the head from beginning to end.
This is the origenal toy I used for the head unaltered.


Saturday, March 30, 2019
A bunch of random things that never recieved their own posts.
Like the title says these are things that never made it to a post on their own because of one reason or another. I figure nobody will see this post anyways so didn't put a lot of effort into it but I do think everything here is cool.


Subscribe to:
Posts (Atom)
